前言 GitLab Community Edition 新版本已经集成了CI/CD的支持,从某种程度上来说可以告别对于Jenkins的依赖,我本来计划是写基于Docker部署GitLab但感觉还是有点重,对于内网离线环境来说基于容器部署也未必是合理的方案,这里沿用传统的部署方式介绍简单且长期有效的GitLab部署方案供大家参考,或许未来会增加基于容器的部署方案和CI/CD的分享,因需而变。
RHEL7/CentOS7在线和离线安装GitLab配置实践,GitLab汉化配置使用小结
更新记录 2018年04月19日 - 完善内容
阅读原文 - https://wsgzao.github.io/post/gitlab/
扩展阅读
GitLab Installation - https://about.gitlab.com/installation
GitLab简介 GitLab是利用Ruby On Rails开发的一个开源版本管理系统,实现了一个自托管的Git项目仓库,是集代码托管,测试,部署于一体的开源git仓库管理软件,可通过web界面来进行访问公开的或私人项目。与Github类似,GitLab能够浏览代码,管理缺陷和注释。可以管理团队对仓库的访问,它非常易于浏览提交过的版本,并提供一个文件历史库。它还提供一个代码片段收集功能可以轻松实现代码复用,便于日后需要的时候查找。
Git的家族成员
Git:是一种版本控制系统,是一个命令,是一种工具。
Gitlib:是用于实现Git功能的开发库。
Github:是一个基于Git实现的在线代码托管仓库,公开项目是免费的,也可以付费创建私人项目。
GitLab:是一个基于Git实现的在线代码仓库托管软件,可以用GitLab搭建一套类似Github的系统。
GitLab对硬件还是有一定要求的,1核心的CPU基本上可以满足需求,大概支撑100个左右的用户,不过在运行GitLab网站的同时还需要运行多个后台job,就会显得有点捉襟见肘了。需要至少4GB的可寻址内存(RAM交换)来安装和使用GitLab,操作系统和任何其他正在运行的应用程序也将使用内存,因此请记住,在运行GitLab之前,您至少需要4GB的可用空间。如果使用更少的内存,GitLab将在重新配置运行期间给出奇怪的错误,我用虚拟机来分别新建1G,2G内存的CentOS系统来装GitLab,确实非常捉襟见肘啊,伤不起。
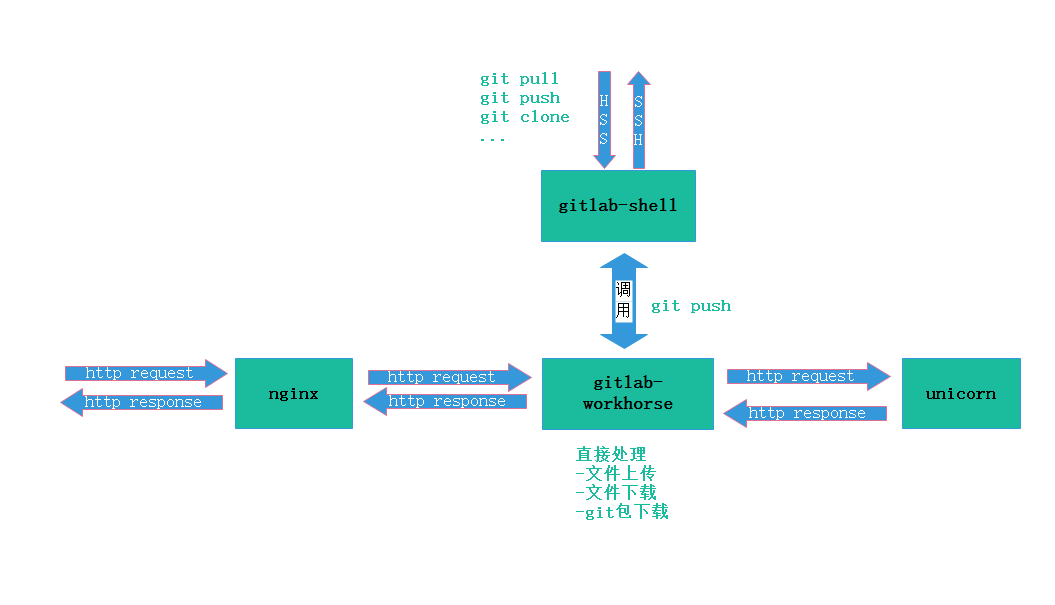
Gitlab的服务构成
Nginx:静态web服务器
gitlab-shell:用于处理Git命令和修改authorized keys列表
gitlab-workhorse: 轻量级的反向代理服务器
logrotate:日志文件管理工具
postgresql:数据库
redis:缓存数据库
sidekiq:用于在后台执行队列任务(异步执行)
unicorn:An HTTP server for Rack applications,GitLab Rails应用是托管在这个服务器上面的
GitLab工作流程
GitLab安装 基础依赖 1 2 3 4 5 6 7 8 9 10 11 12 13 yum install curl policycoreutils openssh-server openssh-clients -y systemctl enable sshd systemctl start sshd yum install postfix systemctl enable postfix vim /etc/postfix/main.cf inet_interfaces = all inet_protocols = ipv4 systemctl start postfix
在线安装gitlab-ce 1 2 3 4 5 6 7 8 9 10 11 12 13 14 15 16 17 18 19 20 21 22 23 24 25 26 27 28 29 30 31 32 33 34 35 36 37 38 yum install pygpgme yum-utils sudo yum install -y curl policycoreutils-python openssh-server sudo systemctl enable sshd sudo systemctl start sshd sudo firewall-cmd --permanent --add-service=http sudo systemctl reload firewalld sudo yum install postfix sudo systemctl enable postfix sudo systemctl start postfix cd /etc/yum.repos.d/ && rm -f *.repowget -O /etc/yum.repos.d/epel.repo http://mirrors.aliyun.com/repo/epel-7.repo wget -O /etc/yum.repos.d/CentOS-Base.repo http://mirrors.aliyun.com/repo/Centos-7.repo curl https://packages.gitlab.com/install/repositories/gitlab/gitlab-ce/script.rpm.sh | sudo bash vim /etc/yum.repos.d/gitlab_gitlab-ce.repo [gitlab-ce] name=gitlab-ce baseurl=http://mirrors.tuna.tsinghua.edu.cn/gitlab-ce/yum/el7 repo_gpgcheck=0 gpgcheck=0 enabled=1 gpgkey=https://packages.gitlab.com/gpg.key gitlab-ctl reconfigure 0.0.0.0:80
离线安装gitlab-ce 1 2 3 4 5 6 7 8 9 10 11 12 13 14 15 16 17 18 19 20 21 22 23 24 25 26 27 28 29 30 31 32 33 34 35 cd /etc/yum.repos.d/ && rm -f *.repowget -O /etc/yum.repos.d/epel.repo http://mirrors.aliyun.com/repo/epel-7.repo wget -O /etc/yum.repos.d/CentOS-Base.repo http://mirrors.aliyun.com/repo/Centos-7.repo curl https://packages.gitlab.com/install/repositories/gitlab/gitlab-ce/script.rpm.sh | sudo bash vim /etc/yum.repos.d/gitlab_gitlab-ce.repo [gitlab-ce] name=gitlab-ce baseurl=http://mirrors.tuna.tsinghua.edu.cn/gitlab-ce/yum/el7 repo_gpgcheck=0 gpgcheck=0 enabled=1 gpgkey=https://packages.gitlab.com/gpg.key yum install -y yum-plugin-downloadonly mkdir -p /tmp/repo/gitlab-ce/yum install --downloadonly --downloaddir=/tmp/repo/gitlab-ce/ gitlab-ce rpm -ivh /tmp/repo/gitlab-ce/* gitlab-ctl reconfigure 0.0.0.0:80
GitLab汉化
如果团队里英文水平都不错的话,是没必要汉化的,我个人的建议是坚持使用原版不做汉化
我这边测试GitLab 10.6.3 新版本中官方已经集成了简体中文,虽然不完整但应该是一个好的开端,设置方式如下
GitLab中文社区的项目,v7-v8.8是由Larry Li发起的“GitLab中文社区版项目”https://gitlab.com/larryli/gitlab
从v8.9之后由@xhang开始继续汉化项目https://gitlab.com/xhang/gitlab
1 2 3 4 5 6 7 8 9 10 11 12 13 14 15 16 17 18 19 20 21 22 23 yum install -y git mkdir -p /tmp/gitlabcd /tmp/gitlabgit clone https://gitlab.com/xhang/gitlab.git git clone https://gitlab.com/xhang/gitlab.git -b v10.0.2-zh gitlab-ctl stop cp /tmp/gitlab/gitlab/* /opt/gitlab/embedded/service/gitlab-rails/ -rfsource ~/.bashrcgitlab-ctl reconfigure gitlab-ctl restart
GitLab 常用命令 1 2 3 4 5 6 7 8 9 10 11 12 13 14 15 16 17 18 19 20 21 22 23 24 25 26 27 28 29 30 31 32 33 34 35 gitlab-ctl command (subcommand) Service Management Commands start stop restart status tail service-list graceful-kill gitlab-ctl start gitlab-ctl start nginx gitlab-ctl tail gitlab-ctl tail nginx General Commands help reconfigure show-config uninstall cleanse gitlab-ctl show-config gitlab-ctl uninstall
公网邮箱配置 默认情况下,GitLab用qq邮箱注册是发不出确认邮件的。查看了网上很多邮箱配置的教程,大部分都是误导的。像这类软件,归根到底总结为一句话:一切以官网文档为准。QQ邮箱最好用企业邮箱,本人用个人邮箱进行测试是有些小问题的,正确配置如下:
其他邮箱可以参考官方给出的 SMTP 配置 SMTP Settinghttps://docs.gitlab.com/omnibus/settings/smtp.html
QQ企业邮箱 1 2 3 4 5 6 7 8 9 10 11 12 vim /etc/gitlab/gitlab.rb gitlab_rails['smtp_enable' ] = true gitlab_rails['smtp_address' ] = "smtp.exmail.qq.com" gitlab_rails['smtp_port' ] = 465 gitlab_rails['smtp_user_name' ] = "xxxx@xx.com" gitlab_rails['smtp_password' ] = "password" gitlab_rails['smtp_authentication' ] = "login" gitlab_rails['smtp_enable_starttls_auto' ] = true gitlab_rails['smtp_tls' ] = true gitlab_rails['gitlab_email_from' ] = 'xxxx@xx.com'
163邮箱 1 2 3 4 5 6 7 8 9 10 11 12 13 14 vim /etc/gitlab/gitlab.rb gitlab_rails['smtp_enable' ] = true gitlab_rails['smtp_address' ] = "smtp.163.com" gitlab_rails['smtp_port' ] = 25 gitlab_rails['smtp_user_name' ] = "gitlab@163.com" gitlab_rails['smtp_password' ] = "123456" gitlab_rails['smtp_domain' ] = "163.com" gitlab_rails['smtp_authentication' ] = "login" gitlab_rails['smtp_enable_starttls_auto' ] = true gitlab_rails['gitlab_email_from' ] = 'gitlab@163.com' gitlab_rails['smtp_tls' ] = false gitlab_rails['smtp_openssl_verify_mode' ] = false
阿里云企业邮箱 1 2 3 4 5 6 7 8 9 10 11 12 vim /etc/gitlab/gitlab.rb gitlab_rails['smtp_enable' ] = true gitlab_rails['smtp_address' ] = "smtp.mxhichina.com" gitlab_rails['smtp_port' ] = 465 gitlab_rails['smtp_user_name' ] = "gitlab@aliyun.com" gitlab_rails['smtp_password' ] = "************" gitlab_rails['smtp_domain' ] = "aliyun.com" gitlab_rails['smtp_authentication' ] = "login" gitlab_rails['smtp_enable_starttls_auto' ] = true gitlab_rails['gitlab_email_from' ] = 'gitlab@aliyun.com'
GitLab使用 登录GitLab
在浏览器的地址栏中输入IP即可登录GitLab的界面,老版本第一次登录使用的用户名和密码为 root 和 5iveL!fe
首次登录会强制用户修改密码。密码修改成功后,输入新密码进行登录
创建Project 1.安装Git工具linux:安装Git,使用自带的源安装
yum install git
2.生成密钥文件:使用ssh-keygen生成密钥文件.ssh/id_rsa.pub。
ssh-keygen -t rsa
3.在GitLab的主页中新建一个Project
4.添加ssh key导入步骤2中生成的密钥文件内容:
Profile Settings => SSH Keys => Add SSH key
简单配置 1 2 3 4 5 6 7 8 9 10 11 12 13 14 15 16 17 18 git config --global user.name "wangao" git config --global user.email "wangao@test.com" git clone git@172.28.70.126:root/test.git cd test / echo "test" > test.shgit add test.sh git commit -m "test.sh" git push -u origin master
配置 GitLab 设置外部访问链接 1 2 3 4 5 6 vim /etc/gitlab/gitlab.rb external_url "https://repo.gitlab.com"
HTTPS 配置 1 2 3 4 5 6 nginx['enable' ] = true nginx['redirect_http_to_https' ] = true nginx['ssl_certificate' ] = "/etc/gitlab/ssl/server.crt" nginx['ssl_certificate_key' ] = "/etc/gitlab/ssl/server.key"
应用配置 1 2 3 4 5 6 7 8 9 sudo gitlab-ctl reconfigure sudo gitlab-ctl start sudo gitlab-ctl status
GitLab 备份升级迁移 GitLab 备份 1 2 3 4 5 6 7 8 9 10 11 12 13 14 15 16 17 18 19 20 21 22 23 24 25 26 27 28 29 30 31 32 33 34 35 36 37 ansible-rhel7.4@JQ/opt/gitlab/etc Dumping database ... Dumping PostgreSQL database gitlabhq_production ... [DONE] done Dumping repositories ... * root/ansible ... [DONE] * root/ansible.wiki ... [SKIPPED] done Dumping uploads ... done Dumping builds ... done Dumping artifacts ... done Dumping pages ... done Dumping lfs objects ... done Dumping container registry images ... [DISABLED] Creating backup archive: 1524016954_2018_04_18_10.6.3_gitlab_backup.tar ... done Uploading backup archive to remote storage ... skipped Deleting tmp directories ... done done done done done done done done Deleting old backups ... skipping ansible-rhel7.4@JQ/opt/gitlab ansible-rhel7.4@JQ/var/opt/gitlab/backups total 22372 -rw------- 1 git git 22906880 Apr 18 10:02 1524016954_2018_04_18_10.6.3_gitlab_backup.tar
GitLab 升级 1 2 3 4 5 6 7 8 9 10 11 12 gitlab-ctl stop rpm -Uvh gitlab-ce-10.6.3-ce.0.el7.x86_64.rpm gitlab-ctl reconfigure gitlab-ctl start
GitLab 迁移
GitLab 迁移的前提是新旧机器GitLab版本必须一致
在旧机器备份,默认会在/var/opt/gitlab/backups/ 创建备份文件#gitlab-rake gitlab:backup:create
复制备份文件到新机器 /var/opt/gitlab/backups/
在新机器运行下面命令,停止相关数据连接服务,然后从备份文件恢复
启动gitlab
1 2 3 4 5 6 gitlab-ctl stop gitlab-rake gitlab:backup:restore BACKUP=1524016954 gitlab-ctl start
GitLab 常见问题 更改管理员密码 1 2 3 4 5 6 7 8 9 10 11 12 gitlab-rails console production Loading production environment (Rails 4.8.5.2) irb(main):001:0> user = User.where (id : 1).first => irb(main):002:0> user.password=123456 => 123456 irb(main):003:0> user.password_confirmation=123456 => 123456 irb(main):004:0> user.save! => true irb(main):005:0> quit
The requested URL returned error: 401 while accessing
这里遇到的问题是因为需要在参数里增加授权后的用户名和密码,不排除可能因为其它问题引起相同报错,如果是403可能是私有仓库没有授权导致
(ox-zRbE61dW) test101@JQ/home/ox/git$git clone http://172.31.96.248/wangao/ansible.git http://172.31.96.248/wangao/ansible.git/info/refs
fatal: HTTP request failedhttp://guest:xxxxxx@172.31.96.248/wangao/ansible.git
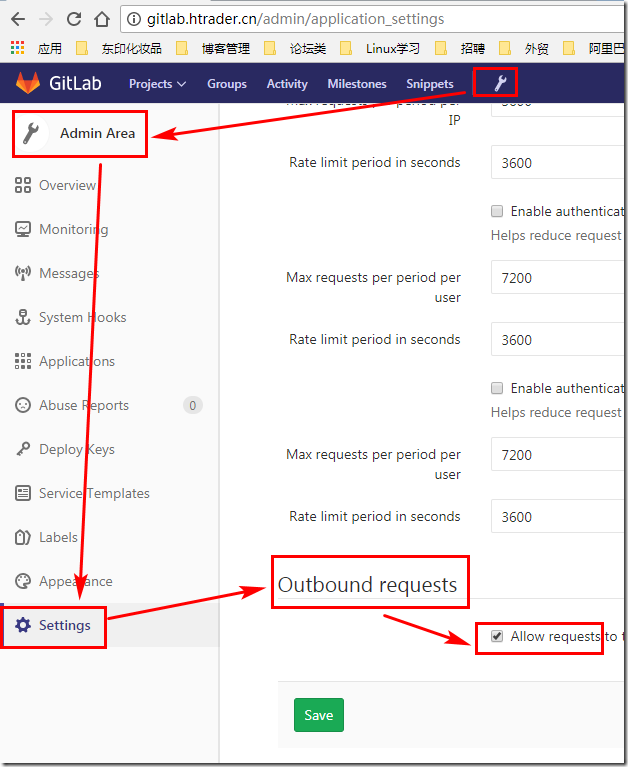
webhooks不生效 https://gitlab.com/gitlab-org/gitlab-ce/issues/45334 https://gitlab.com/gitlab-org/omnibus-gitlab/issues/3307#note_64245578
Admin Area - Settings - Outbound request - 勾选以下内容