DEFAULT menu.c32 MENU TITLE ESXi6.0u2 Boot Menu NOHALT 1 PROMPT 0 TIMEOUT 80 LABEL install KERNEL mboot.c32 APPEND -c boot.cfg MENU LABEL ESXi6.0u2 ^Installer LABEL hddboot LOCALBOOT 0x80 MENU LABEL ^Boot from local disk
1 2 3 4 5 6 7 8 9 10 11 12 13 14 15 16 17
#KS.CFG
# Accept the VMware End User License Agreement vmaccepteula
# Set the root password for the DCUI and Tech Support Mode rootpw admin123 # Install on the first local disk available on machine install --firstdisk --overwritevmfs
# Set the network to DHCP on the first network adapter network --bootproto=dhcp --device=vmnic0
#自定义安装脚本,安装httpd,编辑脚本ks.cfg vim /var/www/html/ks.cfg # # Sample scripted installation file # # Accept the VMware End User License Agreement vmaccepteula # Set the root password for the DCUI and Tech Support Mode rootpw mypassword # Install on the first local disk available on machine install --firstdisk --overwritevmfs # Set the network to DHCP on the first network adapter network --bootproto=dhcp --device=vmnic0 # A sample post-install script %post --interpreter=python --ignorefailure=true import time stampFile = open('/finished.stamp', mode='w') stampFile.write( time.asctime() )
#编辑ESXi ISO复制过来的boot.cfg文件,添加kernelopt=ks=http://172.16.8.7/ks.cfg vim /var/lib/tftpboot/boot.cfg
menu background splash.jpg menu title Welcome to Red Hat Enterprise Linux 6.7! menu color border 0 #ffffffff #00000000 menu color sel 7 #ffffffff #ff000000 menu color title 0 #ffffffff #00000000 menu color tabmsg 0 #ffffffff #00000000 menu color unsel 0 #ffffffff #00000000 menu color hotsel 0 #ff000000 #ffffffff menu color hotkey 7 #ffffffff #ff000000 menu color scrollbar 0 #ffffffff #00000000
label linux menu label ^Install or upgrade an existing system menu default kernel vmlinuz append initrd=initrd.img ks=http://192.168.1.1/rhel67/ks.cfg ksdevice=eth10 label vesa menu label Install system with ^basic video driver kernel vmlinuz append initrd=initrd.img nomodeset label rescue menu label ^Rescue installed system kernel vmlinuz append initrd=initrd.img rescue label local menu label Boot from ^local drive localboot 0xffff label memtest86 menu label ^Memory test kernel memtest append -
Tftpd32 is a free, opensource IPv6 ready application which includes DHCP, TFTP, DNS, SNTP and Syslog servers as well as a TFTP client.
TFTP
Trivial File Transfer Protocol was first defined in 1980, it is a lightweight version of the FTP protocol that has no directory browsing or password capability. Employing UDP rather than TCP for transport, TFTP is typically used to transfer firmware upgrades to network equipment such as routers, switches and IP phones.It is also used to boot diskless computers (PXE).
SNTP
Simple Network Timle Protocol is a simplified version of NTP (Network Time Protocol). They synchronise the time on workstations across a network.
DHCP
DHCP assigns IP addresses to client stations logging onto a TCP/IP network. It eliminates having to manually assign permanent IP addresses on each station.
Syslog
Syslog is a service for remotely logging data. For example, it allows to monitor videoless network equipments.
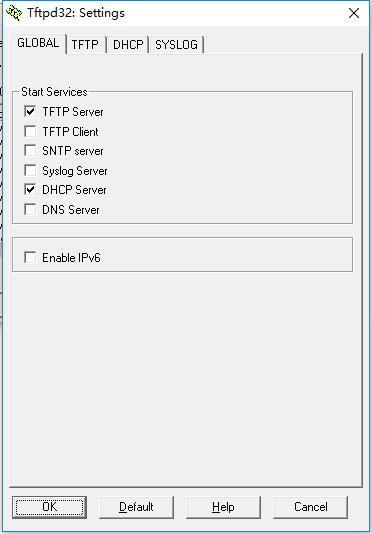
Tftpd server Settings
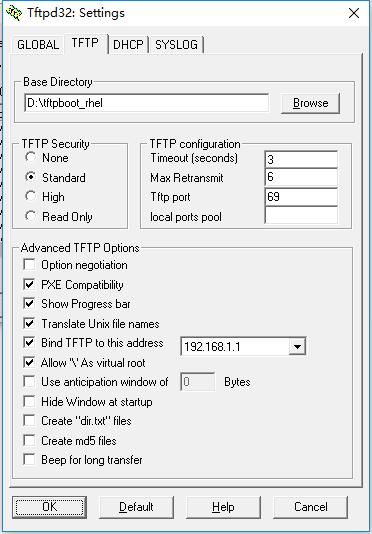
Base directory The default directory used by the TFTP client and server. It may be changed from the main window.
Global Settings Enable or disable tftpd32 servers and clients.
TFTP security
NONE (Not recommended !) read and write requests are allowed on all disks/directories.
Standard read and write requests are allowed but limited to the current directory.
High idem standard + write requests are allowed only if the input file exists and is empty.
Read only idem standard + write requests are rejected.
TFTP Configuration
Timeout The maximum timeout between two retransmissions
Max Retransmit The maximum retransmission for the same packet
Tftp Port The port used to listen incoming requests
local ports pool A range of ports (for example 3000:3030). These ports are used for the file transfers.
TFTP Configuration
Option Negotiation Enables the negotiation between client and server (RFC 2347)
PXE compatibility Enables only the file size negotiation
Show progress Bar Creates a gauge window for each transfer
Translate Unix file names Translates any slash characters to a backslash
Bind Tftpd32 to this address Enables TFTP only on one interface
Allow ‘' As virtual root A file name beginning with ‘' points to the TFTP directory and not to the root of the disk
Use anticipation window of ??? bytes Tftpd32 is able to send packets before receiving acknowledgements. This feature may dramatically speed up the transfer.
Hide window at startup Tftpd32 main window remains hidden, but the icon in the tasktray is still present
Create dir.txt files For each incoming read request, Tftpd32 lists the content of the directory and put the result in a file named “dir.txt”.
Create md5 file For each successfull read request, Tftpd32 creates a file which is the MD5 signature of the previous file Beep for long transfer Tftpd32 sends a beep once a transfer has ended.
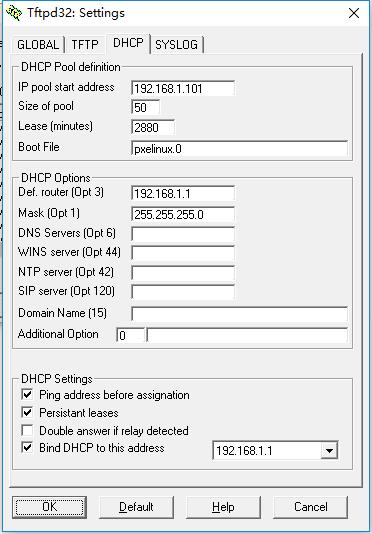
DHCP Setup
IP Pool starting Address This is the first address which will be distributed.
Size of pool This is the number of hosts which may be configured by Tftpd32.
Lease This is the amount of time in minutes the address is leased for.
Boot File Used by diskless stations. It is the file which will be retrieved by TFTP to start up the boot process. The strings $MAC$ and $IP$ are pseudo variables which are translated into the MAC address of the client and its assignated IP address.
Default router The IP address of the LAN gateway.
Mask The network mask which will be assigned to the DHCP clients.
DNS servers The IP address of the DNS. Two DNS can be configured.
WINS Server The IP address of the WINS server.
NTP Server The IP address of the NTP server used for synchronisation.
SIP Server The IP address of the SIP server. It concerns mostly IP phones.
Domain Name Either the NT domain or the internet domain.
Additional Option The first field is the number of the option to be handled The second filed is the value of the field. The value is prefixed with its type (a for list of IPv4 address, x for list of hex digits, b for list of decimal bytes, s for an ASCII string) [legacy prefixes: i for integer, n for network order integers]
More Additional Options ? Tftpd32 supports up to 10 additionnal options. They have to be configured by editing the tftpd32.ini settings file. Their syntax is similar to the previous one.